Showing posts with label elephant. Show all posts

Sunday, 2 September 2012

Elephant No. 336: Coffee Mug


I found a little do-it-yourself paint-a-mug kit in a dollar store a few days ago, and decided to buy one for this blog.

The first known mugs date from around 10,000 B.C. Discovered in China and Japan, these are the earliest drinking vessels to include a handle. They were made of pottery, and were shaped by hand, with the handle added afterwards.

Following the invention of the potter's wheel sometime between 6500 and 3000 B.C., mugs became more common. The biggest disadvantage of these early mugs was that they had very thick walls, making them difficult to drink from. Metalworking allowed for thinner walls in drinking vessels made of silver, gold and lead, but metal mugs couldn't be used for hot beverages. It wasn't until the invention of porcelain around A.D. 600 in China that thin-walled mugs suitable for hot and cold drinks became possible.

Mugs are made with thicker walls than teacups, primarily to insulate the drink from cooling or warming too quickly. Similarly, most mugs have a slightly concave bottom, or an extra ring, also intended to prevent heat or cold from leaching out through contact with the surface on which the mug is placed.

Materials used for mugs are also chosen with thermal insulation in mind. Earthenware, glass, porcelain and bone china all have low thermal conductivity, as do the travel mugs and double-walled thermal mugs introduced in the 1980s.

This is the little kit I bought for two dollars. It includes a stoneware mug, and five markers that are supposed to be permanent on the glazed surface, as long as the final piece doesn't go into a dishwasher or microwave oven.


It's always a bit tricky for me to draw on a surface that's not flat, so I thought I'd work from a photograph. This is the photograph I chose. Because I wanted two elephants on my mug, I also flipped the photograph around to help me in my sketching.


African elephant.
Source: http://www.itsnature.org/news/hunter-
sues-travel-company/


I was actually a bit nervous about this. I'm never great at working in the round, and these markers are apparently not very forgiving of mistakes. It says in the instructions on the box that you can "erase" mistakes by washing them off immediately with soap and hot water. I'm assuming that this means the whole design washes away at the same time. Also interesting: the decorated mug is not supposed to be used for hot foods. I guess I'll be using it to hold pencils, then.

I started by making a rough elephant outline. This part actually took me over an hour. The sketch itself wasn't all that difficult, but the placement was really tough. I either put the design too close to the handle or too close to the middle. The ideal position for any design on a mug is one side or the other of the handle, so that you can see it when you hold the mug.

In washing off my sketches at least four times, I discovered that the markers do indeed bond quite well to the surface almost immediately. I managed to scrub the design off, but it was a bit of a pain.

Eventually I managed to draw two somewhat similar elephants on either side of the handle, each facing towards the middle.


These outlines looked pretty dull, so I added some red bits for highlighting. I hated the red so much that I forgot to photograph it in my haste to fix the ugliness.

This is where I discovered a surprisingly nice feature of the markers. I had chosen yellow to add some more lines as highlighting, but suddenly found the yellow marker reactivating both the blue and the red to make some very nice colour combinations. Lavish use of the yellow marker produced an effect almost like watercolour paint, and I started to like the process very much.


I played with this until I felt I was in danger of overworking the whole thing. I also stopped myself before I began trying to add additional designs throughout the background.


Although I was underwhelmed by my first sketches and the bits of red, once I added the yellow marker and saw what this process could really do, I was actually quite thrilled. I like the final mug very much, and think I might have to go back to the dollar store and buy up a few more of these kits—or at least some white mugs—to try this again.


Elephant Lore of the Day
Although they have adapted to some of the hottest climates in the world, elephants often suffer from severe dehydration. Sometimes it is due to a lack of available water. Sometimes it is due to an overdose of mineral salts. And sometimes it is due to elephants being overworked and not watered consistently.

A few weeks ago, a bull elephant wandered onto a farm in southern India and collapsed of dehydration. Farm workers and local villages sprang into action, quickly erecting a shelter over the elephant to protect it from the heat. The elephant was then rehydrated over a period of several hours.


A shelter being erected over the fallen elephant, August 2102.
Photo: M. Periasamy
Source: http://www.thehindu.com/news/cities/Coimbatore/article3764808.ece


When it was determined that the elephant was well enough to stand, another elephant was brought in. This elephant was tied with a rope to the fallen elephant, and urged backwards as a means of encouraging the weaker elephant to stand. The fallen elephant angrily refused, perhaps preferring the shade and constant infusion of water and treats.

A small backhoe was brought in next. The shovel was placed against the elephant's side, and began to nudge the animal gently. Eventually, the elephant rose reluctantly to its feet. This imposition had clearly displeased the elephant, however, because he turned around and attacked the shovel, pushing at it repeatedly before he decided to turn around and head back into the forest.


The revived elephant turns around and attacks the backhoe, August 2012.
Photo: M. Periasamy
Source: http://www.thehindu.com/news/cities/Coimbatore/article3764808.ece


To Support Elephant Welfare

Thursday, 9 February 2012

Elephant No. 130: Glue-Gun Sculpture


A few weeks ago, at a fibre arts guild meeting, Frances showed us some small pieces she had made with hot glue. One used a mould, if I remember correctly, and one or two were done free-form. Between the sparkly materials she had added, and the bluish glow of the glue, I found them quite fascinating. Hence, today's elephant.

The first known use of an adhesive comes from a 200,000-year-old spear discovered in central Italy, glued with birchbark tar. Interestingly, Ötzi the Iceman, the famous Tyrolean mummy dated to about 3300 B.C., had weapons glued with birchbark tar.  

Adhesives have obviously been used for tens of thousands of years, and were originally based on locally-available materials. Evidence from South Africa suggests, for example, that compound glues made of plant gum and red ochre were used as far back as 70,000 B.C. Ceramics from approximately 4000 B.C. bear residues of animal glues, and in Babylon around 3000 B.C. a tar-like glue was used to repair statues. 

The Ancient Egyptians used animal glues for centuries to bond furniture, ivory, and papyrus, and the Mongols used adhesives in bowmaking. To caulk their birchbark canoes, First Peoples of North America developed a sophisticated compound glue made of spruce gum and fat. And in medieval Europe, egg whites were used to glue gold leaf to parchment.

The first glue factory was founded in Holland in the early eighteenth century, and science advanced, new glues were developed, and old forms of glue were resurrected. In the 1750s, the English introduced fish-based glue for use in veneering, based on old recipes used by the Greeks and Romans. Glue made of from animal bones also became highly popular for general use, although animal glues had been known among various cultures for millennia. Other adhesives based on natural materials included glues made of starch, casein (milk protein) and isinglass—a substance more conventionally used in making jellied desserts. The main difference was that now glue formulae were patented, and their secrets jealously guarded. 

During the nineteenth and twentieth centuries, discoveries in chemistry—and particularly the advent of plastics—considerably advanced the science of adhesives. Modern glues are far more durable, flexible, resistant to chemicals, waterproof, and fast-drying than ever before. Adhesives have also become highly specific, with a glue for every conceivable purpose.

Hot glue—also known as "thermoplastic" glue, meaning it becomes plastic/flexible when heated—is thought to have been invented around 1940 by the U.S. company Procter & Gamble. Hot glue was originally developed as an alternative to the water-based glues then commonly used in packaging: glues that tended to fail in humid climates, causing the packages to open and spill their contents.

The glue I'll be using today is made of something called ethylene-vinyl acetate, and is the most common type of hot glue for craft purposes. Hot glue becomes liquid anywhere from 65˚ to 195˚C (150˚ to 380˚F)—which would probably explain why I tend to burn myself whenever I use hot glue.


Neglect by Carlyle Miklus, 2007.
Source: http://blog.craftzine.com/archive/2007/12/hot_glue_sculpture.html


When it cools, hot glue produces a very strong bond—particularly between porous materials—and, in addition to crafts, is used for glueing paper-based packaging, electronics, manufacturing, and even disposable diapers. There are also both low- and high-temperature guns. Low-temperature guns, which operate around 120˚C (250˚F) are used for gluing things like lace and cloth, and in applications where too much heat is undesirable. High-temperature guns operate closer to 195˚C (380˚F), and produce a stronger bond.

I have no idea what temperatures I'm working with today, but it's probably somewhere between the two ranges above.


Chandelier by Esma Paçal Turam, made with hot glue and paper.
Source: http://kittenita.blogspot.com/2011/02/hot-glue-sculptures.html


Glue-gun sculpture in its purest form seems to be relatively rare, although many artists use hot glue in various sculptural ways. Some certainly use hot glue alone; many combine it with other materials such as wire, paper and fabric; one artist has even attempted lost-glue casting, which is pretty gutsy, in my book.


Hot glue tree by Mike, from the entertaining Mike is Bored blog.
Source: http://mike-is-bored.blogspot.com/2009/06/lost-hot-glue-casting-of-tree.html


Fair warning: I don't like glue guns (in case it isn't already obvious). I tend to burn myself on both glue and glue-gun tip. I make a mess. I don't like the thready glue-gun lines I generally get. But, most of all, when I'm making something, I feel guilty using a glue gun when I could be using thread, or wire, or some other kind of glue.

All that being said, on to today's elephant. My main fear, other than the prospect of burns and mess, was that I wouldn't actually be able to form an elephant. Not having tried anything sculptural before, and reading other people's experiences, I thought the first layers of glue might melt when they came into contact with the second layers, and that I'd end up with a gooey mess. Still, no guts, no glory—well, not glory exactly; but no guts, no elephant, anyway.

I decided to use the smaller of the two glue guns I have, mostly because it's a lot lighter than the professional one I own, and also because it seems to extrude a smaller amount of glue at a time, which I thought might give me more control. 


For glue, I used these inexpensive clear glue sticks. I didn't care for the yellowish undertone, but since I didn't know what I was doing anyway, it didn't really matter. 


A word to the wise before you start: if you expect to be at this for a couple of hours, like I was, make sure your space is well ventilated. The fumes won't make you high (for those of you tempted to make jokes about sniffing glue), but they might give you a bit of a headache and a sore throat. And, yes, I foolishly speak yet again from personal experience.

Working on a sheet of glass, I started by making some little pads for the feet. My idea was to build up the legs from these four unprepossessing blobs. To create these, I touched the tip of the glue gun to the glass, then pressed the trigger on the glue gun very gently, and swirled the glue upwards, keeping the tip attached to the glue until the very end. This seems to help when you're trying to build up the structure vertically.


Below you can see the legs at the second stage, using the same technique. I discovered that, if I didn't leave the tip too close to the previous layer of glue, and didn't use too much glue at a time, the first layer stayed more or less intact.


Once I had the legs done, I started creating the body. This is where it got a little tricky. I started by touching the tip of the glue gun to the top of the leg. From there, while pressing the trigger very delicately, I teased out a thread of glue, which I then attached to the facing leg by simply touching down with the tip. This worked fairly well between the two front legs, and between the two back legs.


It didn't work as well working from front to back. The gap is larger here, so the glue wants to sag and fall into the gap. What I found worked best, after a bit of trial and error, was to make really thin threads of glue by moving the gun back and forth between front and back quickly but steadily.


Having built up a few layers between the two pairs of legs, I got a bit over-confident at one point, and added a blob of hot glue. This was a bad idea, as the volume of hot glue melted through all of my fine threads, and fell to the bottom.

Luckily, the tip of the glue gun functions quite well as a smoothing tool, so I could pull up the glue as it was falling and sort of reattach it.

I reformed the sides of the body, then started creating the middle of the body using the same threading technique. Once I felt that the body was made of enough threads that it was strong enough to hold more substantial amounts of glue—at this point, it looked a bit like a nest made by an addled bird—I filled in the body cavity I had created. 


I figured it was now ready for me to add the neck and head. Thinking that the body was fairly solid, I added a medium-sized blob of glue for the neck. I went to answer the door to a courier, and came back to find that the entire blob had disappeared into the body, and had smoothed out the body as well. Sigh.

I went back to the coiling technique I had used on the legs to build up the neck, and then the head. This was a better idea, because the glue never sits in a large, hot blob. This allows the heat to dissipate relatively quickly, meaning that it hardens and sets before it has a chance to do anything evil and stupid.


Once I was reasonably happy with the size and shape of the head, I added ears, then the trunk. The ears were added with the threading technique, running thin lines of glue around the outside of small nubs I had added on each side of the head. The trunk was created using the coiling technique, pulling the coil out as I worked to keep the coil small, and the trunk thin.


Finally, I added a tiny tail at the back by gently squeezing out a very small drop of glue, then touching it to the elephant and pulling it out, while giving it a bit of a kink. To set the kink, I had to remove the glue gun to allow the glue to cool, supporting the kink with the blade of a pair of scissors (anything non-porous will do) as it set. It only takes about ten seconds for it to set enough that you can let go.


I thought briefly about using the tip of the glue gun to shape and smooth the elephant, but I feared I'd do more harm than good, since this is not a tool with which I'm very familiar. I also decided not to attempt tusks, for the same reason. Maybe if it were bigger, I'd be brave enough to try it, but it's small, so...no. As you can see, it's got many fine threads of glue attached—looking a little like Gulliver pinned to the ground by Lilliputians, if you ask me. I did allow myself to pull those off; otherwise, it's exactly as moulded.


I'm surprised that this turned out at all, to be honest. I expected some blobby wreck with pointy bits sticking out all over the place, but it actually looks like an elephant. 


It's not a work of art, by any means, but it's kind of cute, and not a bad way to spend a couple of hours.


Elephant Lore of the Day
Long the winter home for many American circuses, the state of Florida still has a law on its books stating that, if an elephant is left tied to a parking meter—and the meter has expired—parking fines must be paid, just as if the elephant were a wheeled vehicle.


To Support Elephant Welfare
World Wildlife Fund
World Society for the Protection of Animals
Elephant sanctuaries (this Wikipedia list allows you to click through to information on a number of sanctuaries around the world)
Performing Animal Welfare Society
Zoocheck
Bring the Elephant Home
African Wildlife Foundation 
Elephants Without Borders
Save the Elephants

Saturday, 4 February 2012

Elephant No. 125: Paper Lantern


I happened across some inexpensive paper lanterns in a discount store last week, and thought it might be interesting to try making one into an elephant.

Paper lanterns likely originated in China, and have been recorded as far back as 230 B.C., when they were used, not as decorations, but for military purposes. Invented by military strategist Zhuge Liang, the first paper lanterns were designed to be sent aloft.

Liang based the shape of his first lantern on the hat he was wearing. Made from oiled rice paper stretched over a bamboo frame, the lantern contained a small candle inside. The hot air from the candle caused the lantern to rise and float across the battlefield as a means of communication. These "sky candles", as they were then known, were used as signals until the third century A.D. Some accounts suggest that they also functioned as spy blimps during this early period, although it's hard to imagine how they could have recorded any kind of information.

By the beginning of the Yuan Dynasty (A.D. 1271–1368), paper lanterns were used as symbols of hope and good wishes. Airborne lanterns were used in various rituals, based on the belief that they could carry messages to the gods. People also hung them outside their homes, inscribed with the words "heavenly lantern" or "divine lantern".


Traditional Chinese lanterns.
Source: http://www.lantern-festival.com/about-chinese-lantern/chinese-lantern-making.html


Paper lanterns were also used in ceremonies such as weddings. Wording on wedding lanterns included messages of respect, and wishes for "a hundred children and a thousand grandchildren." Paper lanterns also became something of a status symbol: the more plentiful and elaborate the lanterns, the more prosperous and important the household.

Lantern festivals are held at various times of the year, particularly to herald the return of spring. According to traditional Chinese belief, lantern festivals symbolize the relationship between people and nature, as well as the higher beings that make it possible for the light of spring to return each year.

Today, paper lanterns are still an important feature of various rituals, ceremonies and festivals. In addition, they represent good fortune and longevity, and a means of communicating with deceased loved ones. They have morphed into a vibrant artistic medium as well, featuring new colours, shapes and elaborate constructions.

Paper lanterns have long been popular in many other countries as well—particularly Japan, which has its own significant paper lantern traditions and styles. In western countries, paper lanterns often feature as part of wedding celebrations, parties, and other special events, during which large numbers of paper lanterns are sent aloft, just as they were more than two thousand years ago. 

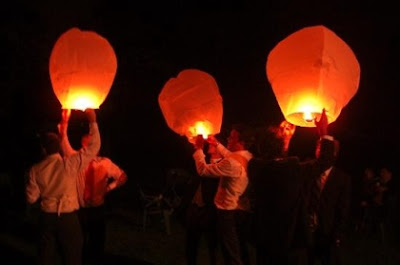
Sometimes this causes problems. In the United Kingdom, for example, so many sky lanterns were being released that, in 2009, the Maritime and Coast Guard Agency asked for advance warning. This is because the lanterns can rise as much as a mile into the sky, and could be mistaken for distress signals. Farmers in the U.K. have also expressed concern about the effect of the lanterns on their livestock, as well as the possibility of fires being started when the lanterns touch down.


Sky lanterns being released at a wedding in England.
Source: http://www.cowesonline.com/zonexml/story?story_id=7164;cp=0


For today's elephant, I didn't have a clue how I was going to make a paper lantern, even as I was shopping for what I thought I'd need. My idea was to use an existing lantern, cutting out various areas to which I would then attach things like a trunk. I've actually never even studied a paper lantern up close, let alone owned one I could take apart, so I wasn't quite sure what I was in for.

I bought this lantern for $1.25. I bought a spare as well, as I more or less expected to wreck the first one in my ineptitude.


It took me awhile to figure out what the plastic thing was for. I thought it was some kind of stand, and must have looked like a monkey trying to assemble a tent while I played around with it. I eventually realized that the plastic thing is what expands the lantern and helps it hold its shape. For the unitiated like myself, some instructions might have been helpful.


My first disappointment came when I realized that it wasn't spherical as I had expected, but oval. I had a round elephant body with limbs in mind, but I decided that the oval shape would limit me to an elephant head, since it looked ridiculous if hung sideways.

My second disappointment was the dearth of information on how to make or alter a paper lantern. All of the instructions relate to those cylindrical slit-paper lanterns we used to make in grade school. Not really what I had in mind, so I guessed I was on my own.

What surprised me was how few relatively simple animal-shaped lanterns are out there. This seems to be changing, but most animal lanterns appear to be round lanterns with flat bits like ears stuck on. I wanted at least the trunk to be tubular, so this was hardly helpful.


Typical form for an animal lantern.
Source: http://www.alibaba.com/product-gs/469508569/2011
_the_best_fashion_round_animal.html


Another typical animal lantern.
Source: http://www.diytrade.com/china/4/products/2605369/
Animal_s_paper_lantern.html


Well, there was round, and then there was this.


Dog lantern produced for the 1st Annual Illumifest of Lights
in West Des Moines, Iowa, U.S.A., 2008.
Source: http://www.paws-effect.org/2008_09_01_archive.html


I wanted light to shine through the trunk, so I decided I'd cut a hole in the existing lantern, make a tubular trunk covered with tissue paper, and add on a couple of flat ears. If it looked like it needed anything else after that, I'd think about it.

I used galvanized wire to make a coiled trunk. I'd say the wire is about 20- or 22-gauge, but you could use anything that holds a reasonable shape. 


To start the trunk, I attached the wire to itself at the top with a small wrap. This is also how I finished the tip.


Since I knew that I'd have to cover the join where the trunk attached to the head, I decided not to cover the trunk itself with tissue paper right away. Instead, I traced the shape of the top of the trunk onto the lantern. I then cut away the paper on the lantern to a slightly smaller diameter than the trunk, without cutting any of the existing lantern coil. It doesn't have to be perfect, because it's going to be covered.

I then wired the trunk coil to the lantern with thin wire, joining it at four spots. I actually pulled the thinner wire out of a twist tie, which worked quite well.


Next, I formed a couple of ear shapes from the same wire that I'd used for the trunk coil.


To attach these to the head, I poked the wire ends through the side of the lantern, and simply bent them down with a stick (since it was hard to get my hand in far enough).


I now had all the wire shapes attached to the lantern, and could start covering them with tissue.


I started with the ear, reasoning that the trunk would be more delicate once it was covered in tissue, so should be left for last. I bought the inexpensive kind of tissue paper you use to stuff in gifts, so it was fairly thin and smooth. This was less of a drawback than I expected it to be, because tissue paper is surprisingly durable for this particular application.


I put a thin bead of white glue along the wire, then attached a flap of tissue paper. Word to the wise: trace your tissue around the ear form before attaching the wire ear to the head, and don't forget to leave a "seam allowance" all the way around. I had to trace the tissue while it was on the head, which is a pretty clumsy exercise. You'll need two tissue ears for each side if you want to cover the wires completely.


I also added a bead of glue to the fold of tissue at the base of the ear, then stuck the tissue to the lantern, which also hid the ugly wire join. To finish the ear, I ran another bead of glue to the inside of the wire, and a bit of glue to the outside rim of tissue, then stuck on the facing piece of tissue. I planned to trim the outside edge of the ear when I was done, so I wasn't too concerned about tidiness at this point.


I finished the other ear the same way, then turned my attention to the trunk. The first thing I thought I should do was cover the tip of the trunk, so that the main trunk covering overlapped it neatly. This was messy and a bit annoying, because the tissue is thin, and the glue bled through. It stuck to my fingers, and my fingers stuck to it, pulling it and tearing it a couple of times before I stopped using my fingers and used a stick instead. This is my third try, and although it's not perfectly neat, it was good enough.


Next I covered the main part of the trunk. Twice. I screwed up badly the first time by not cutting the tissue paper in a large enough cone. This left a gap where the underside of the trunk joined to the lantern. I decided that, rather than try to cut the proper shape beforehand, I'd just glue a big piece of tissue to the front of the coil, let that dry, then glue some more, and so on. This worked better, and I was able to trim off the excess neatly enough. 

This time, I liked the fact that the glue saturated the tissue, because it allowed me to mush it into the crevices, and allowed me to stick on a small patch that is virtually invisible, even with light shining through. It was a messy enterprise, however, and a bit fiddly, so I forgot to photograph the process.

I thought about adding eyes, but decided that might make it a bit cartoonish. This is what the final lantern looks like unlit.


And this is what it looks like lit up, and hanging in my shower.


This wasn't all that difficult, but it was a bit time-consuming in that you have to wait for the glue to dry at various stages—or take a hair dryer to it, like I did.

If I had a few days, rather than a couple of hours, it would be interesting to experiment with different shapes. White glue does a great job of sticking tissue paper to wire, and the shape is really only limited by your imagination. 

My imagination would have been happier if the base lantern had been round rather than oval, but it still looks pretty cool when lit up—better than my photos suggest. It was also far less scary or difficult than I expected, and at $1.25 a lantern, plus a couple of dollars or so for tissue paper, glue and batteries, it's definitely worth a try.


Elephant Lore of the Day
Although sky lanterns are lighter than air, elephants obviously aren't. One of the most popular stories in China is the tale of Cao Chong and the weighing of an elephant.

Cao Chong was the son of Cao Cao, a northern ruler during the Three Kingdoms Period (A.D. 220–280). Cao Chong was renowned for his intelligence, even at an early age. When he was about six years old, his father received an elephant as a gift. Cao Cao and his people had never seen an elephant before, as China's elephants had long been driven far to the south. It was bigger than any animal they knew. Soon two questions arose, "How much does it weigh?" and "How can we weigh it?"

A heated discussion arose among Cao Cao's officials. One said, "We must build a huge scale." Another said, "How can we build a scale big enough for such a creature? And how can we be sure the elephant won't step off? The only way to weigh the elephant is to cut it into pieces and weigh those."

People laughed and called the man stupid, ridiculing the idea of killing such a noble animal just to see how much it weighed. 

Little Cao Chong then stepped forward and said, "I know how to weigh the elephant. We must take him to the river."

No one believed that a six-year-old boy could have better ideas than Cao Cao's officials, but since he was the ruler's son, they humoured him.

The elephant was brought to the river, where a boat was waiting. The elephant was coaxed onto the boat, and when the boat stopped rocking under the elephant's weight, the waterline was marked on the side of the boat. The elephant was then led off the boat and back onto dry land. 

Next, the boat was loaded with rocks and boulders until it sat at the same waterline. The rocks were then removed and individually weighed, equalling the weight of the elephant. History doesn't record exactly how much Cao Cao's elephant weighed, but as an Asian elephant, it would have weighed somewhere between 2,500 and 5,400 kilograms (5,500 to 12,000 pounds), depending on its age and gender.

Today, this story is still told to students around the world to teach them the principles of water displacement. Elephants, however, are no longer loaded on and off boats to check their weight. Instead, they are usually weighed on large scales embedded in the floor, allowing them to simply walk on and walk off.


To Support Elephant Welfare
World Wildlife Fund
World Society for the Protection of Animals
Elephant sanctuaries (this Wikipedia list allows you to click through to information on a number of sanctuaries around the world)
Performing Animal Welfare Society
Zoocheck
Bring the Elephant Home
African Wildlife Foundation 
Elephants Without Borders