Showing posts with label sewing. Show all posts

Tuesday, 25 September 2012

Elephant No. 359: Wooden Buttons


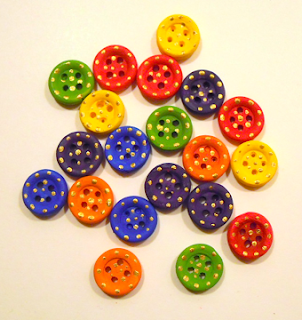
I was in a dollar store yesterday and happened across a package of rather nice wooden buttons, so I thought I'd try painting them for today's elephant.

Since I've already covered the history of buttons in a previous post, I'll just describe today's activity here.

This was the package of buttons I bought—40 buttons for a mere $1.29, which I thought was a pretty good deal.


It contained four different sizes—ranging from 2.5 cm (1 inch) in diameter to 0.6 cm (1/4 inch)—with the bulk of the buttons being in the smallest size.


At first, I didn't think I wanted to paint all of them today. Then I decided to at least cover each of in a basecoat of solid colour. I chose the three primary colours and the three secondary colours, and divided the buttons more or less equally into each colour.


Because of the size of some of these, I didn't bother to draw anything with a pencil, instead just winging it. I quickly discovered that the smallest buttons were just too small to paint any kind of recognizable elephant—mostly because of the holes—so I stopped painting those.


The holes were actually a bit of an issue, because it was too easy to think of them as eyes, and hard to remember that they would ultimately be filled in with thread. There are also four holes to each button, making them fairly intrusive. Once I sew these to something, I suppose I'll see how successful I was in thinking around the holes.

Once I'd painted all but the smallest buttons with grey elephant shapes of some sort, I left them to dry.


Because these looked awfully plain to me, and because it was virtually impossible for me to add shading or outlines with any kind of finesse, I decided to add gold. I added a little gold crown to each, then a gold dot for an eye. I also added gold dots all around the rim of each button.


To make the smallest buttons match, I added a few gold dots in the central area, and dots to the rim.


This was a pretty simple activity, although it was quite time-consuming to paint the underlying colours. There is a front, back and rim to each, as well as holes to jam paint into, so it takes a while to cover the entire surface.

As for the elephant shapes, those took no time at all. The gold dots were fairly quick as well, and not even as tedious as I expected.

If I ever decide to use these on actual clothing, I'll probably have to seal them with varnish. I'm not sure I want elephant buttons on my own clothing, but they'd probably be fun on kids' clothing or a bag of some sort.

It took me a few hours to make all of these, mostly because of the underpainting, but it's not a stressful or difficult activity. I also really liked the idea of painting my own buttons, so I'm sure I'll try a variation on this again sometime.


Elephant Lore of the Day
Elephants don't like to be teased. When people extend food towards an elephant, then pull it away at the last minute, the elephant will often suffer the indignity for a short time. When the elephant has had enough, however, it will usually retaliate with tactics that range from blasting the offender with muddy water, to a good smack with tusks or trunk. Even baby elephants will readily express their displeasure, as seen in the video below of a baby elephant being teased with tasty morsels of banana.


It's an even worse idea to tease a fully grown elephant. And if an elephant suspects you of trying to steal some of its food, the consequences can be quite serious. Elephants have been known to kill people for simply borrowing a bit of hay to use as a bed, and think nothing of tossing people against a wall if unduly irritated.

In the video below, a man appears to be trying to bond with an elephant by offering it palm fronds. He also looks at one point as though he might be trying to remove one of the fronds—at least, that's how the elephant probably viewed it. If you've ever wondered how far you'd fly if an elephant were to hit you with its trunk, this video will give you a pretty good idea.


To Support Elephant Welfare
Fauna & Flora International

Friday, 17 August 2012

Elephant No. 319: Appliqué


I received a beautiful book on floral embroidery last Christmas in a fibre-guild gift exchange, and it contained some very pretty appliqué embroidery. Today I seem to have a bit more time on my hands, so I thought I'd try appliqué for today's elephant.

Appliqué—from the French appliquer, "to apply"—is simple in concept: create a design with cut-out fabric shapes, then stitch the shapes to a backing fabric. Appliqué can consist of elaborate scenes, or be as simple as a heart shape stitched to an apron. Today, appliqué is most commonly used on quilts and similar forms of fabric art.


Appliqué on hand-painted silk by Barbara Harms.
Source: http://www.etsy.com/listing/64629769/applique-art-quilt-original-hand-painted


Although I did some basic appliqué as a child, the technique I planned to use today was completely new to me. In the past, I'd just cut out fabric in the shape I wanted, then stitched the edges with a buttonhole or blanket stitch, or folded the edges over and top-stitched the edges. Today's technique involved ironing fusible interfacing to the back of the coloured fabric, cutting it out, then stitching it down. It sounded like a lot of work, but I was hoping to be pleasantly surprised.

For today's elephant, I thought I'd use scraps of silk left over from various sewing projects. For the background, I decided to use black dupioni silk.

For the design, I thought I'd make something fanciful rather than try to copy a photograph. I had a feeling this was going to be a fairly time-consuming activity, so a fanciful design with fewer blocks of fabric might make my life easier. I started by making a sketch in black.


Next, I made templates to use for each colour of fabric. Because some of these shapes layer over one another, I obviously couldn't just cut apart my original sketch.


I was disappointed to discover that my stash of silk scraps didn't include anything even remotely approaching grey or brown. So I decided on a pink elephant. I placed each piece of the template on the requisite colour of silk, and loosely cut around it. I then ironed the piece of silk onto a lightweight fusible woven interfacing.


Once I had all the loose shapes bonded, I cut them out more precisely. I now had all the building blocks for my design.


I had originally thought I was going to sew all of this on the sewing machine. The pieces were all rather small, however, which made me think I'd spend a frustrating amount of time unstitching and restitching things that had moved around under the sewing machine's presser foot. So I opted to stitch everything by hand.

I stretched the black background in an embroidery hoop, then thought about how the pieces needed to be layered. I started with the body of the elephant, then added the head. I used a lock stitch to top-stitch everything, which allowed the edges to fray a bit. I was hoping the slight fraying would add character.


I outlined the elephant, and added a few wrinkles and lines in the ear and trunk. I decided to leave the eyes and tusks until last, since I was going to stitch them rather than apply silk. I did, however, add a small tail using the same pink thread I'd used to stitch the elephant itself.

Next, I added the crown. The fabric I'd chosen for the crown showed a decided tendency to shred, so I used an edge stitch to make sure it held together.


Next I added the two balloons and the blades of grass.


The final appliqué elements were the flowers.


To finish the elephant, I added eyes, tusks, and strings for the balloons. I also trimmed away a few tiny frayed edges to tidy it up a bit.


This took me absolutely forever. I honestly had no idea it would take me all day, and I don't even think a sewing machine would have made it go faster. A few tips if you decide to try something like this:

1. Make sure your fabric doesn't shred easily. Even if you stitch it by machine, some fabrics just aren't up to top-stitched appliqué.

2. Think carefully about the order in which you'll stitch the pieces to your backing. I almost forgot that the crown had to go under the elephant's head to give it the outline I wanted.

3. Don't worry about uneven stitching and slightly frayed edges. In my opinion, both add a bit of character to a piece like this.

4. You don't need to use embroidery thread for details, unless you want to. I decided from the outset that I would only use sewing thread so that it looked stitched rather than embroidered.

I really like the final piece—probably because I like the jewel tones of silk, and because I used lots of colour. In the end, however, it was a bit too fiddly and time-consuming for me, and I doubt very much that something like this could ever become my main art or craft practice.

In fact, the idea of doing an entire quilt using this technique is something that I think might make my head explode.


Elephant Lore of the Day
Despite an ability to drill their own wells in the desert, elephants are certainly not averse to easier sources of fresh, clean water.

At the rather exclusive Etali Safari Lodge in South Africa, staff were certain that one of their open-air whirlpool baths had sprung a leak. Each morning the bath was filled, and each night it was bone dry. A massive leak seemed the only possibility, but plumbers could find no leak at all.

One afternoon in May 2010, a guest at one of the private lodges heard a loud slurping noise. Going outside to investigate, the guest discovered the aptly named Troublesome sucking all the water out of the whirlpool. Although this particular elephant is known to rangers on the reserve for her interest in all things human, no one had any idea that she was behind the disappearing water.

Troublesome was caught in the act, but even after seeing the photographic evidence, the owners couldn't quite believe it. Remembering, however, that elephants can drink more than 200 litres (40 gallons) of water a day, it made sense that an entire whirlpool could be drained by a single elephant.

Lodge owners have since provided Troublesome with an alternate source of water; Troublesome, however, remains more interested in the whirlpool. According to staff, Troublesome is always welcome at the Lodge—although they suggest that visitors check to see if the elephant is around before taking a dip.


Troublesome taking a drink at Etali Safari Lodge in South Africa. By the look of her
skin, she probably gives herself a shower as well.
Photo: © Caters News Agency Ltd.
Source: http://www.dailymail.co.uk/news/article-1280882/Mystery-constantly-draining-
jacuzzi-solved-elephant-caught-camera-DRINKING-it.html


To Support Elephant Welfare
Elephant sanctuaries (this Wikipedia list allows you to click through to information
on a number of sanctuaries around the world)

Sunday, 29 July 2012

Elephant No. 301: Thread Painting


A couple of months ago, one of the women at my fibre arts guild showed us a piece of art made entirely of thread stitches. It looked a bit complicated, but I tucked it away in my mind to try for this blog. Since I have a bit of time today to fool around with something new, I thought I'd try thread painting for today's elephant.

Thread painting can be done in a number of ways. Some artists stitch over a preprinted design on fabric, or paint something themselves that they then stitch over. Others draw a design on water-soluble material, lay it on top of fabric, and stitch through both layers. The water-soluble material is then removed. A third type involves stitching through water-soluble material onto tulle, in order to create delicate lace. Almost all forms of thread painting use a sewing machine.


Thread painting by fibre artist Jan Rickman. This piece is stitched onto a
hand-dyed background.
Source: http://www.janrickman.com/Jan_Rickman_Contemporary_
Fiber_Art_Techniques.html


Although much thread painting is similar to machine embroidery on fabric, the type I decided to try for today's elephant involved stitching directly onto a water-soluble material. Once the design was complete, I would soak the piece in water to remove the backing, leaving me with fabric composed entirely of thread. That was the plan, anyway.

This was the brand of water-soluble material I bought, which feels a bit like non-woven interfacing. I remembered someone telling me that there are certain brands that rinse away more completely than others, but I wasn't sure if this was one of them.


Because I'd never tried thread painting before, I looked up a couple of tutorials online. I found this set of printed instructions useful, and these. A "thread painting" search on YouTube turns up a number of helpful tutorials as well. My favourite was a Nancy Prince video called "Stitches with Attitude", but it wouldn't upload here.

I started, as all the instructions suggest, by putting a piece of the water-soluble material into an embroidery hoop—upside-down to how I'd normally use it. The hoop apparently makes it easier to manoeuvre the piece of embroidery around in the sewing machine.


Next, I drew a loose rectangle and sketched an elephant shape onto it.


I decided to tackle the background first, which I thought would look interesting in multiple shades of green. The stitching method is rather weird, to be honest. For those of you who sew, you don't use the presser foot or pretty much any other kind of guide or tool. The needle just sort of goes up and down and floats wherever it wants, unless you're fairly careful to guide it with your hands. I didn't like this rather chaotic approach. Then again, if you use a presser foot, you can't see what you're doing at all.

I started with a forest green, making a bunch of loose vertical lines.


Next, I layered over these with an olive green. I really had no clue what I was doing, but I did like the interplay of colours. I was less fond of the way the water-soluble material stuck to the needle sometimes.


I also discovered that the water-soluble stuff has a marked tendency to tear if it's subjected to any strain at all. The elephant actually began ripping away from the background. This made me think that it might be a good idea to start laying in the elephant—if for no other reason than to secure the elephant and background to one another.

Stitching the elephant part just about made me toss the thing in the corner. I had mistakenly used inexpensive thread, which wrought havoc on my sewing machine's ability to stitch anything sensibly. It skipped stitches, broke the thread more times than I could count, and both bobbin and top thread became hopelessly tangled at least a dozen times.


When the elephant was roughed in, it was so lumpy, ugly, and stringy-looking that I began thinking I should have had a backup plan for today's elephant.

After a restorative cup of tea, I decided that I'd had enough of the freeform-no-presser-foot business. Accordingly, I put the presser foot back on, and began running lines of stitching all through the elephant. This tidied it up considerably. The downside was that I couldn't clearly see what I was doing most of the time.


Once I'd more or less repaired the grey of the elephant, I added a couple more shades of green to the background. I stuck to a vertical pattern, except around a few tricky corners. I also had the sinking feeling that the vertical lines might not overlap enough to keep them from shredding apart when the water-soluble stuff was rinsed away, So I added a few sweeping lines of green across the background.

To finish up the elephant, I added a bit of pink in the ears and mouth, a bell and necklace, and an eye. I also thought it needed a bit of definition in a couple of places, so I added a few single lines of black stitching.


This is what it looked like when it was still dry.


I was tempted to leave it at this and just clip off all the white stuff. But since I'd gone to all the trouble and trauma of using the water-soluble material, I decided to soak the piece in a bowl of hot water.

The instructions for the water-soluble material say to launder it. That was not going to happen with this particular piece, because I just knew I would end up with an unrecognizable wad of coloured thread.

I left it to soak for about an hour, occasionally rubbing off a bit of the water-soluble stuff, which becomes a bit like wet paper when soaked.


Eventually I'd had enough of that as well, and began running the piece under hot water. This still didn't remove every last shred of the water-soluble material, but it was at least presentable now.

The whole thread-painting process was highly irritating at times, but the result is interesting enough that I'll probably try it again. The final piece isn't as pretty as I'd hoped, but I may remedy that by adding a few beads and maybe a bit of hand embroidery, or even machine-stitch some darker grey to add a few shadows.

A few tips if you decide to try this:

1. Work on background and main design at the same time, or the water-soluble material will tear all over the place.

2. Keep extra bits of the water-soluble stuff on hand to lay under torn areas, then stitch over them.

3. Use good thread and sharp needles. The needles will become dull quickly, and the frustration of frayed thread and skipped stitches isn't worth the money you might save on cheap thread.

4. Make sure you have lots of thread on hand in your desired colours. My final piece measures only about 10 cm (4 inches) by 7.5 cm (3 inches), but I went through the combined equivalent of two 500-metre (550-yard) spools of thread. This activity is, however, a good way to use up weird colours you may have lying around.

5. Be prepared for your shape to deform along the way. Despite the fact that this was secured in an embroidery hoop, the water-soluble material is very fragile, with a tendency to shred and stretch. In my case, I went from a rectangle to something that looks like a template for a tiny lampshade.

This piece took me hours, so there is no way I'm trying it again anytime soon. On the other hand, I learned enough that I'm sure I will use this technique at some point. Next time on something even smaller, and with top-of-the-line thread.


Elephant Lore of the Day
Elephants are known for their intelligence, but not much is written about their ability to assess a problem and find a solution.

In 1922, W. Henry Sheak, who had worked around elephants most of his life, wrote about a large female Asian elephant with the Ringling Brothers menagerie. This particular elephant was often used as a "pushing elephant", manoeuvring wagons into place with her head.

One morning, the assistant superintendent of the menagerie used the elephant to push a heavy wagon across a muddy lot. At one point, the wagon got hopelessly mired in the mucky ground. Unfortunately, the more the elephant pushed, the deeper the wheels sank.

The elephant pushed for a minute or two, then stopped, stepped back and eyed the vehicle. To Sheak's astonishment, the elephant then stepped forward and reached down with her trunk. Heaving one of the wheels free while pushing with her head, she freed the wagon in no time.


Asian elephant pushing a wagon in Australia, ca. 1908.
Source: http://circuszooanimals.blogspot.ca/2011/04/princess-alice-
lady-of-wonderland-city.html


To Support Elephant Welfare
Elephant sanctuaries (this Wikipedia list allows you to click through to information
on a number of sanctuaries around the world)
Wildlife Trust of India

Friday, 30 March 2012

Elephant No. 180: Polymer Clay Button


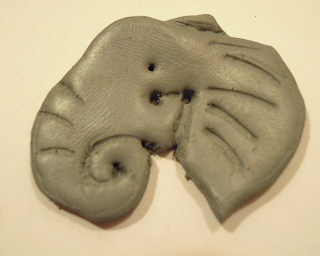
When I was out for lunch today with my best friend, she suggested that I try making polymer clay buttons for today's elephant. We've often admired distinctive polymer clay buttons on high-end knitwear at craft fairs, so it seemed like an excellent idea.

Polymer clay is a sculpture material with a PVC (polyvinyl chloride) base. It generally contains no mineral clay, and is only called "clay" because it has a similar texture and plasticity to earth-based clays. Occasionally, small amounts of kaolin or white china clay are added to make the material more opaque, and mica is sometimes added to clays with a pearlescent or metallic look.

Polymer clay is closely related to Bakelite, an early hard plastic. The first polymer clays were actually uncured Bakelite, and kits containing the material were available to designers. Unfortunately, the phenol base in uncured Bakelite was highly flammable, and the kits were discontinued.

Modern polymer clays are based on a plastic modelling material that came to the attention of a German dollmaker named Kaethe Kruse in 1939. Plastics for such frivolous purposes as dollmaking had become hard to get during the early days of the Second World War, and polymer clay was touted as a possible replacement. The material wasn't suitable for use in the doll factory, so Kruse gave it to her daughter Sophie, whose nickname was Fifi. The formula was later sold to the company Eberhard Faber—a manufacturer of art and drawing supplies—which marketed it under the name FIMO for "FIfi's MOdelling Compound"). Today, one of the world's most popular brands of polymer clay is still sold under that name.

Meanwhile, across the ocean in the United States, the Zenith Products Company of Illinois was making coatings for the fastener industry, including waxes, varnishes and hot-melt glues. Their brand of polymer clay, called "Sculpey" started out life as a thermal transfer material, designed to draw heat away from electrical transformers. Although it proved ineffective for this purpose, a visitor to the factory in the mid-1960s happened upon the material and made a small figure. The figure was baked in a lab testing oven, and Sculpey was born. Sculpey is also still sold today under the same name.


Polymer clay jewellery by Chris Kapono/Mandarin Moon.
Source: http://mandarinmoonart.blogspot.ca/


Today, polymer clay is a highly popular artistic medium, used to make jewellery, figures, vessels and more. Polymer clay art jewellery can also be found in the permanent collections of numerous museums of design and fine arts. 

I've used polymer clay before, although it's been awhile. I like its mouldability very much, but I'm not always keen on the fact that it's essentially a plastic. In the past, I've made small figures, but I'd never tried a button.

For today's elephant, I pulled out a small container of polymer clay that I've had for about a decade. Some of it is still in its package, as you can see. I also have bits of various other colours that I've blended—because one of the very nice things about polymer clay is that you can generally resuscitate it, no matter how old it is. The older and harder it is, the longer you'll have to knead it, but it's possible.


I happened to have a piece of grey in my box of tricks that I think I actually blended from black and white at one point. Since it was somewhat hard, it took an inordinate amount of time to knead to a workable consistency. The heat of your hands and the action of smushing it around are what help it to soften.


Once it was soft enough to use, I flattened it between a folded-over piece of waxed paper with a marble rolling pin. You don't need a marble rolling pin or waxed paper, but I didn't want it to stick to the rolling pin, and I wanted the heaviness of this particular rolling pin. When I was finished, it was about 0.3 cm (1/8 inch) thick, which seemed about right for the kind of button I had in mind.


I lightly scribed a design with a bamboo skewer.


When that looked okay to me, I cut it out with a pair of sharp, thin-bladed embroidery scissors. You can use a knife for this, but a knife will tend to do one of two things: drag the edge and create little tears, or compress the edge in a way that may not be aesthetically pleasing to you. It wasn't aesthetically pleasing to me, anyway.


Once it was cut out, I smoothed the edges with the tip of the bamboo skewer. To emphasize the interior lines, I gently drew the point of the skewer along the lines at a 45˚ angle. The angle helps keep the line smooth because it doesn't drag through the material as much as a 90˚ angle might. As you can see in the photographs, I wasn't completely successful in avoiding fine cracks, but they don't show except in the cruel light of extreme closeup. If the clay had been a bit fresher, this probably wouldn't have happened. You can also see a few fingerprints in the larger areas, but these will usually disappear when the piece is baked.
 
To finish, I poked two holes with a small finishing nail, and made a small channel between them to hold the thread when I sew this onto something. One helpful tip: choose a spot for the threading holes that's already more or less a part of the general design of your button. In mine, for example, I put one of the holes in an area I had already delineated for the line between head and ear.


The final step involves baking this in a regular oven at 135˚C (275˚F) for about 12 minutes for this particular thickness. When it's baked, it feels a bit like ceramic, and is fairly rigid.

When I was making this, I tried to think of whether or not the shape would fit through any kind of normal buttonhole. At first I wasn't sure it would—at least, I wasn't sure it would fit through some kind of buttonhole slit and still keep something fastened—but it actually works. And even if it didn't, it could at least be stitched to something as a decoration of some sort.

The hardest part of this activity was kneading the elderly clay I chose to use, but I really like the way it turned out. If I'd had more time today, I might have been inclined to add some colour; but for now, I'm pretty happy with this. In fact, now that I know I can make decorative buttons, I may be making a few more. Just not today.


Elephant Lore of the Day
Elephants have often been used in publicity stunts, but rarely in their own cause. That changed in 2009, following the birth of a baby panda at the Chiang Mai Zoo in Bangkok, Thailand.

Although the elephant is Thailand's national symbol, following the birth of the baby panda, the entire country went panda-crazy, and the elephants were ignored. Sick of all the fuss over a single panda cub, the keepers of the Ayutthya Elephant Kraal painted their five elephants as pandas and paraded them before large numbers of schoolchildren and their families.


Panda-painted elephants on parade, Bangkok, Thailand, June 2009.
Photo: © Reuters
Source: http://www.dailymail.co.uk/news/article-1195683/Will-stop-pandamonium-
Thai-elephants-painted-look-like-pandas-black-white-bears-steal-fans.html


Some members of the public groused to the Bangkok Post that the elephant-keepers had gone too far. Others, however, applauded the action, suggesting that in the middle of all the, er, panda-monium, a little reminder of the country's national symbol was not such a bad idea.

Painted with white water-based paint and red writing on their sides that jokingly said "Panda" in English and Thai, the elephants marched up and down for a short time before returning to their enclosure for a bath and a snack.


Panda-painted elephants in their enclosure, Bangkok, Thailand, June 2009.
Photo: © Reuters
Source: http://www.dailymail.co.uk/news/article-1195683/Will-stop-pandamonium-
Thai-elephants-painted-look-like-pandas-black-white-bears-steal-fans.html