Showing posts with label wire and metal. Show all posts

Friday, 10 August 2012

Elephant No. 313: Crocheted Wire


I've crocheted with wire before, although never into anything other than a square or a long line. Since I'm not great at crochet, I feared this might end up being a square that I then folded into an origami elephant or something, but I figured I'd at least try to make a three-dimensional elephant.

I've already covered the history of crocheting, and of wire, for this blog, so I'll just cover the activity as it unfolded.

I started by pulling out all the jewellery-weight wire I have. Because I went through a phase of making knitted wire brooches, I have several interesting colours. I ultimately settled on a turquoise/peacock blue for the elephant, and magenta and lime green for a scarf, all in a 30-gauge size.


I had no pattern for this, and I'm useless at writing things down as I go, so I can't really share the number of stitches and so forth. I'm also pretty useless at crocheting, althoughI like the technique for its ability to generate pretty much any shape you want—as long as no one looks too closely at how it was made. For my previous adventures in crocheting for this blog, you can look at my crocheted lace and crocheted wool. Feel free to laugh.

Using a 1.25 mm crochet hook, I started by making a circle until it seemed about as wide as I wanted the tiny little head. Once I'd reached the diameter I liked, I stopped enlarging it and began making it smaller again.


As I made this first circle smaller, I was also able to taper the shape into the beginnings of a trunk. From the little trunk base, I chained enough stitches for what looked like an acceptable length of trunk, then turned back from the tip and crocheted single crochet back towards the head, where I finished the shape and pulled the ends inside.


I turned my attention to the body next, making a sort of oval using a similar technique, albeit not tapered to the same extent. I left a small neck opening at the end of the body, and crocheted this onto the head.


I added legs next. To do this, I made a slip knot and attached the wire through the lower body. I chained a few stitches—seven for the front legs and five for the back. I then used single crochet to make my way back up to the body, where I stitched through the body once, then back down with single crochet, finishing off at the bottom. I made each leg individually using this technique.


I added a tail next by attaching wire with a slip stitch through the top of the elephant's back end, and simply chained a few stitches. At the end of the tail, I left a small bit of wire.

For the ears, I chained three stitches through the head on each side, going around these stitches on both sides until I liked the shape, adding fewer stitches at the base of the ear. I also stitched through the head each time I went around.


To give the elephant a little scarf, I chained about twenty stitches in magenta and lime green, making two separate strands that I then twisted together. To finish off, I poked and squeezed the elephant into shape, then added the scarf and shaped it.


It took me two hours to make the elephant, but I'm quite happy with this little guy. He's not a work of art, but as a tiny little blue elephant, I think he's pretty cute.


Elephant Lore of the Day
Although today's elephant lore is about one of the most famous elephants in history, I've avoided writing about it because it's such a heartbreaking story.

Mary was a five-tonne Asian elephant who performed in the Sparks World Famous Shows circus. In September 1916, the circus was in Kingsport, Tennessee, and took on a few locals as temporary circus hands. A hotel worker named Red Eldridge was among them—hired as an assistant elephant trainer, despite a complete lack of experience.

On the evening of September 12, he took Mary to a pond to splash and have a drink. According to one witnesss, Eldridge poked her behind the ear with a hook when Mary reached down to nibble at a piece of watermelon. This enraged Mary, who snatched Eldridge with her trunk, tossed him against a drink stand, then crushed his head by stepping on it.

The sensationalist newspapers of the time went even further in their accounts, claiming that Mary had tossed Eldridge in the air, skewered him with her tusks (despite the fact that female Asian elephants don't have tusks), then trampled him "with all the force of her beastly fury."

Accounts of what followed are somewhat confused, although most say that Mary calmed down immediately afterwards and didn't charge the crowd or appear aggressive. A crowd surrounded Mary, however, chanting "Kill the elephant!" A few minutes later, a local blacksmith shot at her five times, with no real effect. Mary was chained up while the circus decided what to do with her.

In the meantime, the leaders of several nearby towns threatened to cancel circus performances if Mary was part of the show. Circus owner Charlie Sparks reluctantly decided that the only way to solve the problem was to execute Mary in public.

On September 13, 1916, Mary was transported by train to a railyard in Erwin, Tennessee, where a crowd of more than 2,500 people—including the town's children—gathered to watch. Mary was hanged by the neck from an industrial crane mounted on a railcar. The first attempt broke the chain, dropping Mary to the ground and breaking her hip.

As people fled in horror, the severely injured Mary was hauled up again, dying in agony during this second attempt. She was buried by the railway tracks.

This was not the end of Mary's legacy, however. For one thing, it was the last time an elephant was hanged as a means of execution, although there have been other equally stupid and inhumane methods used over the years. More importantly, Mary's sad story has been enshrined in a number of plays, stories and even songs as a cautionary tale about our mistreatment of other species.


Although heavily doctored, this photograph is apparently
similar to most images of Mary's death.
Source: http://en.wikipedia.org/wiki/File:Elephantmary.jpg


To Support Elephant Welfare
Elephant sanctuaries (this Wikipedia list allows you to click through to information
on a number of sanctuaries around the world)

Monday, 6 August 2012

Elephant No. 309: Painted Metal Pail


I must admit that today was one of those days when I absolutely didn't feel like making art or doing a craft of any kind, but I'd already bought a metal pail to paint, so I bit the bullet and did it anyway.

I wasn't sure, despite combing the Internet and asking at art stores, whether or not acrylic paint would actually work on metal. Some sources say you need to prime or sand the metal first. Others say any acrylic paint will be fine. My theory is this: if I can paint on glass with a certain type of paint, I can use the same type of paint on metal. Having now used acrylics on glass with no ill effects, I decided to use acrylics on my galvanized pail.

This is the pail I bought. Not bad for two dollars.


I was pretty sure I wasn't going to want to create anything too realistic today. On the other hand, my creative imagination was a bit tired, so I decided to work from a photograph.

This is the photograph I chose. I chose it partly for the shape of the photograph—which I thought would fit nicely in the oblong area between the pail's ridges—and partly because there's water in the picture. After all, this was a pail I was painting.


A teenage elephant makes a warning charge, Okavango Delta, Botswana, 2010.
Photo: Nick Pattinson
Source: http://www.australiangeographic.com.au/journal/elephant-fiesta-
in-the-okavango-delta.htm

I started by drawing a faint sketch on the pail with pencil, then used a sort of black-purple to outline the elephant and add some rudimentary shading.


I decided to add more purple next, along with white for the tusks. One thing I discovered with this next layer of paint, however, was that, if anything is the least bit wet, the paint reactivates and moves around. So I decided to let this dry while I added some grass and water around the elephant.


After the grass and water had also dried, I painted more purple on top of the elephant. The more I painted, the less I liked it. I noticed that the paint tended to be streaky, and that even if I added several layers, it didn't get much better. I liked the metallic undertone, but the streaks weren't what I had in mind. So I decided to change tack.


The tusks had worked well because I'd used thick paint and a sort of pouncing/pointillism technique. I decided to try that on the rest of the design. I started on the grass and water, and kind of liked how it looked, so I began doing the same thing over the elephant.


Unfortunately, the elephant colours were strangely dark, no matter what I did, so I began using weird colours like orange and yellow and green. The paint still tended to get sucked into the surface, but I liked the way it looked a little more.


Once I'd done the elephant, I added some more dots to the water and grass to pull the design together. As a final touch on the elephant, I added some light blue to represent the water dripping from its tusks and trunk in the photograph.


It looked very abstract at this point, but I'd more or less had enough and didn't really want to go back to brushstrokes again. To finish up the pail, I scattered dots across the blank areas of the pail, using the colours I'd used in the elephant.


This activity was both easy and difficult. Painting galvanized metal with acrylic paint wasn't the greatest idea if using brushstrokes, and although the pointillism technique was easy and worked well, it was tedious. I'm also not positive about how well the design will last. Although it doesn't scratch off with my fingernail, given that I didn't prime the surface before painting, I should probably spray it with acrylic sealant at some point.

I'm not really sure what to do with this pail. The acrylic paint means that it can't really be used to haul water, and it's too big for paintbrushes or pencils. On the other hand, although I don't love the final design, it's not completely hideous, so maybe I'll use it to store small, unfinished projects. Or perhaps to contain some of the 300+ elephants currently littering my house.


Elephant Lore of the Day
Yesterday, my friend Michael sent me a stunning photo of a baby elephant in utero. It started me to thinking about elephants and their incredibly lengthy pregnancies.


Baby elephant in utero, from an upcoming Channel 4 documentary.
Source: https://www.facebook.com/wildaid


The average gestation time for a baby elephant is 22 months—the longest for any mammal on Earth. Pity the Asian elephant Azizah, however, who carried her baby for a whopping 700 days—84 days longer than average.

In humans, the longer the gestation period, the larger the baby. In Azizah's case, the exact opposite happened: her calf was the smallest ever recorded at London's Whipsnade Zoo, weighing a mere 104 kilograms (229 pounds).

So small was the baby that keepers worried that he wouldn't be able to feed. He proved a rather smart little fellow, however, and learned almost immediately how to stand on his toes to reach his mother's milk.


Azizah and her calf at London's Whipsnade Zoo, October 2011.
Photo: © PA
Source: http://www.dailymail.co.uk/news/article-2054522/Elephant-gives-
birth-year-pregnancy--longest-recorded-British-zoo.html

To Support Elephant Welfare
Elephant sanctuaries (this Wikipedia list allows you to click through to information
on a number of sanctuaries around the world)


Tuesday, 3 July 2012

Elephant No. 275: Hobo Nickel


I ran across this technique a few days ago and decided to try it on a day when I might have a bit more time.

Hobo nickels are modified coins which have been altered to produce miniature bas-relief scenes or figures. The tradition dates back to at least the 1750s, when people produced "love tokens" by smoothing off the face of a silver coin, then recarving it with initials, messages, flowers, animals or scenes. In addition to love tokens, low-denomination coins were often reworked simply as a way to pass the time.

The term "hobo nickel" arose sometime after the introduction of the Indian Head/Buffalo nickel in 1913. The large Indian head and its relatively thick profile gave artists a large surface on which to work. By comparison, the head on the American Lincoln penny covers only one-sixth of the surface, whereas the head on the Indian Head nickel covers about five-sixths of the surface. Because nickels were low in value, highly portable, and offered a useful canvas, the art of carving them became particularly popular among hobos.


U.S. Indian Head/Buffalo nickel, 1913–1938
Source: http://tywkiwdbi.blogspot.ca/2009/03/hobo-nickels.html


Almost as soon as the Indian Head nickel was introduced, people began altering them. Interestingly, the greatest quality and variety of styles in early (1913–1940) hobo nickels is found on coins with a 1913 date. In fact, more classic old hobo nickels were produced on 1913 nickels than on any other date before 1930. 


Hobo nickel on 1913 nickel by unknown engraver.
Source: http://www.cointalk.com/t75657/


During the 1930s, when many men took to wandering the country in search of work—as, yes, hobos—the art of hobo nickels expanded even further. Some of the best-known engravers of hobo nickels began their careers during this period, often continuing to produce them well into the late 1970s.


Recent hobo nickel engraved on buffalo side of nickel.
Source: http://www.armstrongengraving.com/hiking-hobo-nickel.html


Following the introduction of the Jefferson nickel in 1938, the Indian Head nickel gradually disappeared from circulation. By the end of the 1970s, they rarely turned up in pocket change, and many engravers either used worn coins, or bought them from coin dealers.

Today, a wide range of hobo nickels are still produced. Some are of very high quality, attesting to the skills of a professional engraver; the wide majority, however, are quickly produced and lack the detail and artistry of high-end works. Names to look for include George "Bo" Washington Hughes and Bertrain Wiegand for early hobo nickels; and John Dorusa, Frank Brazzell and Ron Landis for more modern versions.


"Short hat hobo"—recent hobo nickel by Sam Alfano.
Source: http://www.masterengraver.com/hobo_nickels.shtml


There is also a significant collectors' market for hobo nickels, and even a number of hobo nickel associations and societies, such as the Original Hobo Nickel Society. Modern, lower-quality hobo nickels are still available for a few dollars. Older and more artistic hobo nickels go for a hundred dollars or more. It is estimated that there may be 100,000 to 200,000 classic hobo nickels in existence, many of which are not yet in the hands of collectors. Interestingly, almost all modern hobo nickels (those created since 1980) are already in private and museum collections.

Although these types of coins are called "hobo nickels", this is actually a generic term, referring to any coin that has been defaced and re-engraved. Most of them are indeed five-cent pieces, but there are also many pennies, and even half-dollar and dollar coins that have been given this type of treatment. Nor is the practice limited to the United States, or even North America. Britain, France and South Africa have similar altered-coin traditions.

For today's elephant, I didn't have an Indian Head/Buffalo nickel, but I did have a Jefferson nickel, so I decided to use that. I've never actually tried engraving metal with my rotary tool, so this promised to be interesting.


To hold the nickel in place while I played with it, I used my pin vise. As you can see by how clean it is, it hardly ever gets used.


When I first looked at the Jefferson nickel, I couldn't really see an elephant in the image. Jefferson does have a long pigtail, however, so I focused on that as a potential trunk. To give myself some working lines, I sketched my design onto the surface with a permanent marker. Jefferson's pigtail became the trunk, and his jaw became the lower edge of the elephant's ear. The top of Jefferson's head and his hair had an interesting texture which I thought would be nice for the main part of the elephant's head.


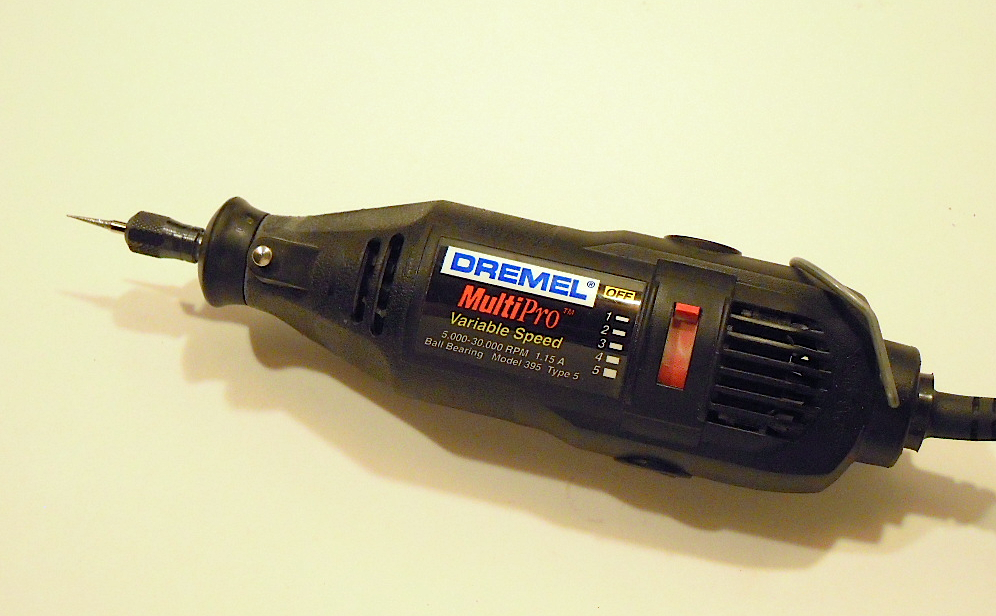
I decided to use my actual Dremel for this, rather my generic rotary tool, because the Dremel is smaller and much easier for me to hold and manoeuvre. I used a pointy diamond bit to start with.


These were my first engraving marks. Feel free to laugh.


Turns out I'm completely clueless when it comes to engraving metal with a power tool. I usually carve stone material with my rotary tools, which is why I have a bunch of diamond bits. And nothing else. While diamond bits work well on stone, shell and glass, they're clearly useless on metal. I didn't realize that this was the problem until after I was finished.

I had no idea why the tool was bouncing off the coin and sliding across the surface. So I switched to a bunch of files, a dental pick and a scribe. I knew these would work on metal, because I've used them before on silver.


I scratched and poked at the design, then used the Dremel tool some more. The Dremel tool did work, but it wasn't as easy as I expected it to be, and it didn't give me the smooth results I expected.


I kept at it for about two hours in total, then decided it wasn't going to get any better. I did try to keep the words intact, but the tool had other ideas sometimes, so it wasn't as much like a traditional hobo nickel as I would have liked. To finish the piece, I polished just the elephant with an abrasive burr.


In the end, however, I wasn't all that disappointed. The final piece is actually quite pretty in real life, and has a rough sort of old-coin look that I like.

When I was first learning to spin yarn, the person teaching me tsaid about my first batch, "You should keep this, because you'll be able to achieve this effect again." I feel that way about this piece. Now that I know what I did wrong, I don't think I'll ever be able to make one like this again. And that's probably as it should be.


Elephant Lore of the Day
As most Americans know, the elephant is the symbol of the Republican Party, also known as the GOP, or "Grand Old Party". Similarly, the donkey is the symbol of the opposing Democratic Party.

The donkey came first. During Democrat Andrew Jackson's 1828 presidential campaign, he was called a "jackass" by his political opponents. Unfazed, Jackson decided to use images of the stubborn creature on his campaign posters. Political cartoonist Thomas Nast later used the Democratic donkey in his newspaper cartoons, making the symbol famous.

Nast was also responsible for the elephant's association with the Republican Party. In a 1874 cartoon published in Harper's Weekly, Nast drew a donkey wearing a lion's skin, terrorizing all the other animals in the zoo. One of the animals running away was an elephant, with the words "The Republican Vote" printed on its side. The elephant has been associated with the Republican Party ever since.

Today, Republicans say that the elephant is strong and dignified, while Democrats say that the donkey is clever and brave.


Political cartoon with Republican elephant and Democratic donkey,
Harper's Weekly, November 7, 1874.
Source: http://www.harpweek.com/09Cartoon/BrowseByDateCartoon.
asp?Month=November&Date=7


To Support Elephant Welfare
Elephant sanctuaries (this Wikipedia list allows you to click through to information
on a number of sanctuaries around the world)
Wildlife Trust of India

Sunday, 13 May 2012

Elephant No. 224: Hammered Aluminum Can


Lately I've been noticing a lot of aluminum cans flattened on the road, and it occurred to me that it might be interesting to try hammering an aluminum can into an elephant shape.

Hammered aluminum was a highly popular material for housewares from the 1930s through the 1960s. In my own collection, I have a couple of hammered platters and colourful anodized aluminum drinking glasses. Touted as an easy-care alternative to silver, hammered aluminum eventually fell out of favour. Today, vintage aluminum ware is enjoying something of a resurgence, with pieces that sold for a dollar or so even a few years ago now going for anywhere from ten to 200 times that.


Typical hammered aluminum platter.
Source: http://www.etsy.com/listing/92891160/hammered-aluminum-
metal-tray-with-deer


That was not the kind of aluminum I was looking to make today, and I was a bit surprised to discover that no one seems to be mashing aluminum cans into shapes. People appear to make only two kinds of art with aluminum cans: flat, hammered surfaces that are then painted, decorated or assembled; or opened and flattened cans that are cut into shapes.


Meanfish crushed and painted aluminum can.
Source: http://www.cutoutandkeep.net/projects/crushed_can_art


Since I'd already done the opened-and-cut-into-shapes thing for my mobile a few months ago, I didn't feel like doing that again. And I didn't want to simply flatten an aluminum can and paint on it. What I really wanted to do was hammer an aluminum can into an elephant shape.

I'd saved four aluminum cans to play with, because I was sure I wasn't going to be successful the first time. I also didn't know yet if I was going to have troubles with the more rigid top and bottom, or if I'd need more than one aluminum can to make an elephant.


For hammers, I pulled out both a 16 oz. carpenter's hammer, and a chasing hammer for finer details. I thought briefly about using non-marking hammers, but then decided that chipped paint might add something to it.


Because I wanted to make this as much like an aluminum can smashed under a car's tires, I started hammering away at the first can without cutting the ends off.


I was pretty brutal about trying to crush one of the ends into the tip of a trunk, but the ends are very thick in comparison to the flimsy sides, so I wasn't entirely successful. There was no way this was going to get this much thinner, without some kind of major crushing machine.


The other thing I quickly discovered is that the thinner material that forms the body of the can is just plain weird. It's as if it's not metal at all. It doesn't smash down entirely flat, doesn't like to crumple very well, and becomes extremely brittle almost right away. I've hammered silver, steel and copper, but I've never seen anything quite like this.

Because of its brittleness, there's only so much hammering you can do before the metal actually starts falling apart. It tears along the smallest folds and splits under any kind of strain, so there comes a point at which you have to leave well enough alone.

For the ears, I started by hand-crimping a second aluminum can. Try as I might, however, I couldn't form ears as long as I had to contend with the thick round ends. If the body of the can had been a bit longer, I might have been able to fold the ends towards the centre, but the round ends were just a bit too large in diameter. After about 20 minutes of fiddling with it, folding, refolding and crimping, I gave in and cut the ends off with a pair of scissors.


This left me with a metal tube, which was relatively simple to hand-crimp and shape into ears and a forehead. I slotted this structure into a gap that had opened in the top of the trunk area, and squeezed things with my fingers to make it stay together. It doesn't stay together nicely—as it would if it were aluminum foil or tin or steel—but I could live with it.

To finish, I shaped a bit of a tusk and left it at that. I did try another elephant with the silver soda cans, this time cutting off the ends right away. Strangely, this was even less successful, and ended up looking a bit like an aluminum albatross. It was so unprepossessing that I didn't even bother to photograph it.

I didn't mind this activity, but I wish I'd known how uncooperative the material would be. It took me about 45 minutes to make the green elephant head, and if I actually decide to keep it, I'll have to add glue or rivets or something to attach it more securely. I don't dare hammer it any further: hammering would only make it more brittle and friable, without making it any more solid.

I was surprised that I didn't cut myself once, although it's certainly not an activity to try with children. I didn't really mind making this elephant, but it's not something I'd rush to try again, primarily because of the weirdness of the material. On the other hand, I am slightly tempted by the idea of running over a couple of soda cans with my car, just to see if it makes the metal any easier to work with.


Elephant Lore of the Day
It's Mother's Day today, so it seemed appropriate to write about elephant mothers.

As research continues to show, elephant mothers—like those of many other species—are no less devoted to their little ones than human mothers. They will fight off packs of predators, profoundly grieve the loss of a baby and, in one notable instance, even beat up a nasty old train.

Nor is this devotion limited to the mother alone. In the video below, a herd of female elephants works tirelessly to save a tiny calf from drowning. As the baby struggles helplessly, various elephants try to pull it out of the water, hold it above the surface, and push it up the banks of the waterhole.

When all of these efforts fail, a pair of elephants enter the water and, squeezing the calf between them, transport it to safety.


To Support Elephant Welfare
Elephant sanctuaries (this Wikipedia list allows you to click through to information
on a number of sanctuaries around the world)