Showing posts with label unusual techniques. Show all posts

Wednesday, 4 July 2012

Elephant No. 276: Excavation Collage


Today I felt like something relatively straightforward, so I settled on this paper technique.

Invented in 1985 by artist Richard Misiano-Genovese, an excavation collage involves gluing together layers of printed material, then ripping through the layers to create a new image. The artist can tear through either one or multiple layers, and can take either large amounts of material away each time, or pick at it in bits.

The idea behind excavation collage is to create a new and perhaps jarring image—in the words of one commentator, "visual poetry"—using a random process.


ES Excavation postcard
by Richard Misiano-Genovese, 2006.
Source: http://collageassemblagecentennial-1912-2012.
blogspot.ca/2012/01/037-richard-misiano-genovese-usa.html


Similar techniques include décollage, déchirage and lacerated poster, although there are subtle differences, and some overlap, between each.

For today's elephant, my excavation collage wouldn't be entirely random, since I was creating a representational image. But I could at least be random in my choice of material. I pulled out a bunch of magazines and catalogues, and tore out pages I liked because they were colourful or otherwise visually interesting. It probably wouldn't make much difference in terms of the final piece, since I wouldn't be able to see the underlying pages, but it was a place to start.

I decided I would probably make two excavated collages today, and thought that eight layers for each was a good number, so I tore out 16 pages in total.


I glued them together loosely with a good-quality glue stick, alternating the direction of each page so that any words would run in opposite directions. I then flattened the two sandwiches under a pile of heavy books to dry. I left them for about a couple of hours while I went off to do errands, but a half-hour or so would do it.

To begin excavating, I used a sharp craft knife to give myself something to dig into with my fingernails.


 I started with this blank, which I decided to orient horizontally.


I couldn't really tell how to do an excavation collage from any of the pictures I looked at—other than that you tear into layers of paper until you get something you like. So I made up my own method, which involved putting the very tip of the knife under the first layer of paper, and lifting up a tiny tab to begin tearing. The picture below shows my first tear.


Right away, I could see that this wasn't necessarily going to be easy. The first issue is the grain of the paper. While paper tears quite nicely along the grain (which runs vertically on most pieces of paper), it doesn't tear cleanly at all if you try to go across the grain.

The second issue is that you can't see what's underneath your working layer. It could be pink, mottled, bright turquoise, or have nothing but lettering.

The third issue is the glue. I ran my gluestick around the edges and in an angled grid across the rest of the paper. This meant that I had no idea where the glue was. Some of the paper was really stuck down, and some peeled away easily.

At first I tried to think of ways around all of these things, then just decided to deal with them as the limitations of the medium. I mostly just scraped with my fingernails and peeled things in various directions with my fingers. If I wanted to stop a strip from peeling too far, I tore against a fingernail pressed into the surface. I thought about using more precise tools such as rulers or knives, but I thought that might be cheating, so I went with ripping and peeling using only my bare hands.


I started by trying to rip an exact elephant shape, then thought it might be more interesting to peel away a sort of background area first. The jury's still out on this idea.


When I came to a layer that I didn't think was the right colour, I peeled it away, hoping to find something better underneath. 


I continued peeling and tearing, until I thought it was about as good as I could make it. I think I tore through about six of the eight layers, but figured I should leave well enough alone, just in case the next layers weren't what I wanted.


I thought this looked okay, but I didn't love it, so I decided to try another one. This time I decided to work vertically.


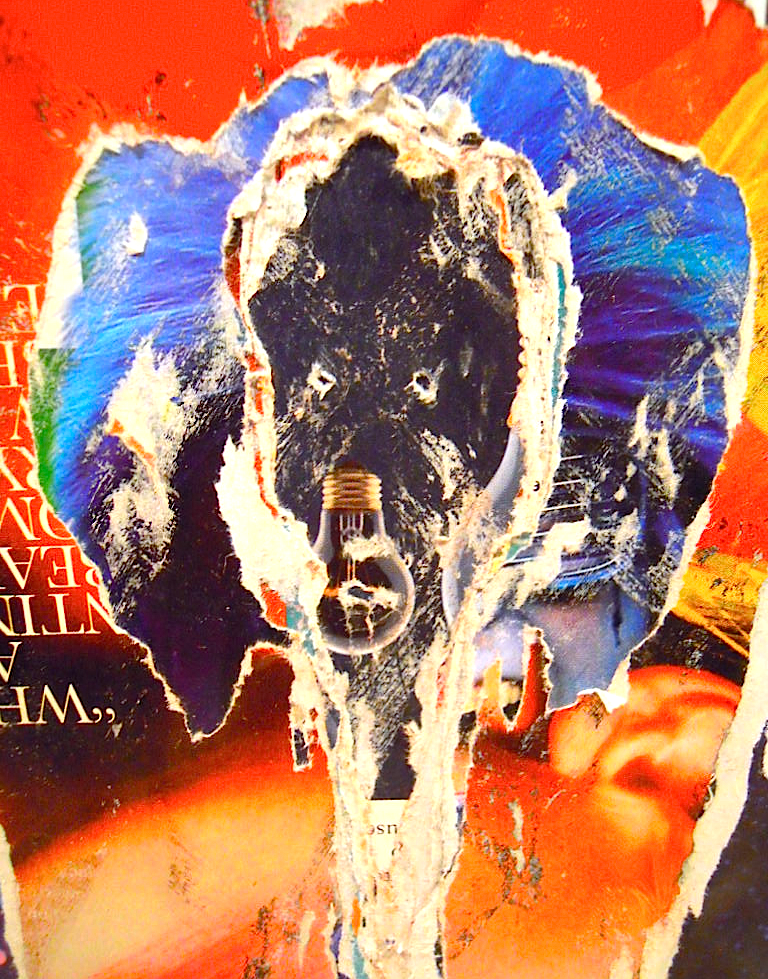
I used the same method as before, ultimately going through all of the layers. I almost pierced right through the final layer, because I didn't really like any of the layers and eventually ran out of options.


I almost stopped at the image just above, except for the human face in the middle. So I continued.


I liked this second one well enough, except for the weird lightbulb in the middle of the elephant's upper trunk. But this black layer was the final layer, so I was more or less stuck with the lightbulb.

The two images took me only about an hour to produce, with an extra hour to find magazine pages, glue them together and trim the edges. It's not a difficult technique by any means, but it wasn't really my cup of tea. I think I would have liked it more if I'd made a sandwich of solid colours instead of magazine images. That being said, I don't hate the final results, and may even try it again sometime.


Elephant Lore of the Day
During the 2000 digging season at Hierakonpolis in Egypt, archaeologists came across a set of elephant molars.

The site being excavated was a massive funerary complex dating to about 3500 B.C., and right away archaeologists were mystified. Elephants were not indigenous to the area, and it appeared that the tombs contained the remains of not one, but two of the exotic creatures.

Thinking that perhaps one elephant had been cut apart and its bones distributed throughout the complex, archaeo-zoologists and archaeologists set out to discover just how many elephants the complex might contain. Partial remains of an elephant had been discovered on the site in 1990, and some assumed that this new find was just more of the same elephant.

The team's task was made more complicated by multiple lootings of the site from antiquity all the way through to the present day. It took a while to decide where to dig for the bulk of the elephant—or elephants, as the case might be. Settling on a smallish pit, archaeologists began uncovering bone after bone.

When they came across a full jaw, they realized that there had indeed been two elephants on the site, since a jaw also existed for the elephant discovered in 1990. As the team continued to dig, they were faced with a new mystery. Why weren't the bones buried in a single grave? And why were most of the bones found in such a small hole?


Elephant in fresco of Rekhmire, Governor of Thebes, Egypt, ca. 15th century B.C.
Source: http://scienceblogs.com/tetrapodzoology/2011/01/19/
ancient-egyptian-pygmy-mammoth/


When the team finally reached the floor of the main elephant grave, they were faced with an astonishing sight. Most of the elephant's largest bones had been laid between two layers of fine linen fabric. In addition to the fabric, there was also a thick layer of blackened elephant skin, often still stuck to the bones.

Other discoveries in this tomb made it clear that the elephant had been buried with honours, rather than left as a food offering to the gods. Not only was it covered with a massive amount of high-quality linen, but it was also provided with grave goods such as red ochre and green malachite eye makeup, a stone mace head, an alabaster jar, an amethyst bead, and perhaps bizarrely, an ivory bracelet. Pottery offerings included fine black-topped beakers, a bowl decorated with white paint, and an imported jar. According to archaeologists, no expense had been spared.

Archaeologists also noted the presence of a number of arrowheads; but whether these were grave goods for the elephant's afterlife, or the cause of its death, was not clear. Also unclear was why the elephant's head was not found with the rest of its body. Perhaps, it was thought, the elephant had been decapitated to make the unpredictable animal less dangerous in the afterlife.

The fact that two elephants had been buried in the complex suggested the status, wealth and power of the people whose tomb it was. In fact, it is likely that the elephants were part of an exotic menagerie that included hippos, baboons, wild cats and hartebeest—comprising what may be the world's oldest zoological collection.


Artists' interpretation of above fresco.
Illustration: © Alessando Mangione/Marco Masseti
Source: http://scienceblogs.com/tetrapodzoology/2011/01/26/
rekhmire-tomb-elephant-prob-syrian/


To Support Elephant Welfare
Elephant sanctuaries (this Wikipedia list allows you to click through to information
on a number of sanctuaries around the world)
Wildlife Trust of India

Tuesday, 3 July 2012

Elephant No. 275: Hobo Nickel


I ran across this technique a few days ago and decided to try it on a day when I might have a bit more time.

Hobo nickels are modified coins which have been altered to produce miniature bas-relief scenes or figures. The tradition dates back to at least the 1750s, when people produced "love tokens" by smoothing off the face of a silver coin, then recarving it with initials, messages, flowers, animals or scenes. In addition to love tokens, low-denomination coins were often reworked simply as a way to pass the time.

The term "hobo nickel" arose sometime after the introduction of the Indian Head/Buffalo nickel in 1913. The large Indian head and its relatively thick profile gave artists a large surface on which to work. By comparison, the head on the American Lincoln penny covers only one-sixth of the surface, whereas the head on the Indian Head nickel covers about five-sixths of the surface. Because nickels were low in value, highly portable, and offered a useful canvas, the art of carving them became particularly popular among hobos.


U.S. Indian Head/Buffalo nickel, 1913–1938
Source: http://tywkiwdbi.blogspot.ca/2009/03/hobo-nickels.html


Almost as soon as the Indian Head nickel was introduced, people began altering them. Interestingly, the greatest quality and variety of styles in early (1913–1940) hobo nickels is found on coins with a 1913 date. In fact, more classic old hobo nickels were produced on 1913 nickels than on any other date before 1930. 


Hobo nickel on 1913 nickel by unknown engraver.
Source: http://www.cointalk.com/t75657/


During the 1930s, when many men took to wandering the country in search of work—as, yes, hobos—the art of hobo nickels expanded even further. Some of the best-known engravers of hobo nickels began their careers during this period, often continuing to produce them well into the late 1970s.


Recent hobo nickel engraved on buffalo side of nickel.
Source: http://www.armstrongengraving.com/hiking-hobo-nickel.html


Following the introduction of the Jefferson nickel in 1938, the Indian Head nickel gradually disappeared from circulation. By the end of the 1970s, they rarely turned up in pocket change, and many engravers either used worn coins, or bought them from coin dealers.

Today, a wide range of hobo nickels are still produced. Some are of very high quality, attesting to the skills of a professional engraver; the wide majority, however, are quickly produced and lack the detail and artistry of high-end works. Names to look for include George "Bo" Washington Hughes and Bertrain Wiegand for early hobo nickels; and John Dorusa, Frank Brazzell and Ron Landis for more modern versions.


"Short hat hobo"—recent hobo nickel by Sam Alfano.
Source: http://www.masterengraver.com/hobo_nickels.shtml


There is also a significant collectors' market for hobo nickels, and even a number of hobo nickel associations and societies, such as the Original Hobo Nickel Society. Modern, lower-quality hobo nickels are still available for a few dollars. Older and more artistic hobo nickels go for a hundred dollars or more. It is estimated that there may be 100,000 to 200,000 classic hobo nickels in existence, many of which are not yet in the hands of collectors. Interestingly, almost all modern hobo nickels (those created since 1980) are already in private and museum collections.

Although these types of coins are called "hobo nickels", this is actually a generic term, referring to any coin that has been defaced and re-engraved. Most of them are indeed five-cent pieces, but there are also many pennies, and even half-dollar and dollar coins that have been given this type of treatment. Nor is the practice limited to the United States, or even North America. Britain, France and South Africa have similar altered-coin traditions.

For today's elephant, I didn't have an Indian Head/Buffalo nickel, but I did have a Jefferson nickel, so I decided to use that. I've never actually tried engraving metal with my rotary tool, so this promised to be interesting.


To hold the nickel in place while I played with it, I used my pin vise. As you can see by how clean it is, it hardly ever gets used.


When I first looked at the Jefferson nickel, I couldn't really see an elephant in the image. Jefferson does have a long pigtail, however, so I focused on that as a potential trunk. To give myself some working lines, I sketched my design onto the surface with a permanent marker. Jefferson's pigtail became the trunk, and his jaw became the lower edge of the elephant's ear. The top of Jefferson's head and his hair had an interesting texture which I thought would be nice for the main part of the elephant's head.


I decided to use my actual Dremel for this, rather my generic rotary tool, because the Dremel is smaller and much easier for me to hold and manoeuvre. I used a pointy diamond bit to start with.


These were my first engraving marks. Feel free to laugh.


Turns out I'm completely clueless when it comes to engraving metal with a power tool. I usually carve stone material with my rotary tools, which is why I have a bunch of diamond bits. And nothing else. While diamond bits work well on stone, shell and glass, they're clearly useless on metal. I didn't realize that this was the problem until after I was finished.

I had no idea why the tool was bouncing off the coin and sliding across the surface. So I switched to a bunch of files, a dental pick and a scribe. I knew these would work on metal, because I've used them before on silver.


I scratched and poked at the design, then used the Dremel tool some more. The Dremel tool did work, but it wasn't as easy as I expected it to be, and it didn't give me the smooth results I expected.


I kept at it for about two hours in total, then decided it wasn't going to get any better. I did try to keep the words intact, but the tool had other ideas sometimes, so it wasn't as much like a traditional hobo nickel as I would have liked. To finish the piece, I polished just the elephant with an abrasive burr.


In the end, however, I wasn't all that disappointed. The final piece is actually quite pretty in real life, and has a rough sort of old-coin look that I like.

When I was first learning to spin yarn, the person teaching me tsaid about my first batch, "You should keep this, because you'll be able to achieve this effect again." I feel that way about this piece. Now that I know what I did wrong, I don't think I'll ever be able to make one like this again. And that's probably as it should be.


Elephant Lore of the Day
As most Americans know, the elephant is the symbol of the Republican Party, also known as the GOP, or "Grand Old Party". Similarly, the donkey is the symbol of the opposing Democratic Party.

The donkey came first. During Democrat Andrew Jackson's 1828 presidential campaign, he was called a "jackass" by his political opponents. Unfazed, Jackson decided to use images of the stubborn creature on his campaign posters. Political cartoonist Thomas Nast later used the Democratic donkey in his newspaper cartoons, making the symbol famous.

Nast was also responsible for the elephant's association with the Republican Party. In a 1874 cartoon published in Harper's Weekly, Nast drew a donkey wearing a lion's skin, terrorizing all the other animals in the zoo. One of the animals running away was an elephant, with the words "The Republican Vote" printed on its side. The elephant has been associated with the Republican Party ever since.

Today, Republicans say that the elephant is strong and dignified, while Democrats say that the donkey is clever and brave.


Political cartoon with Republican elephant and Democratic donkey,
Harper's Weekly, November 7, 1874.
Source: http://www.harpweek.com/09Cartoon/BrowseByDateCartoon.
asp?Month=November&Date=7


To Support Elephant Welfare
Elephant sanctuaries (this Wikipedia list allows you to click through to information
on a number of sanctuaries around the world)
Wildlife Trust of India

Sunday, 1 July 2012

Elephant No. 273: Sparkler Drawings on Paper


Since July is full of national celebrations, and because today is Dominion Day in Canada, I thought I'd try making an elephant using sparklers. My original idea was to strap together a series of firecrackers in the shape of an elephant, but firecrackers are prohibited here by law. I somehow thought that I'd be able to find them around here anyway, since I live a block away from Chinatown, but no luck.

My next idea was to set out a series of sparklers in the shape of an elephant, but my tests earlier in the day weren't terribly effective. The first sparklers didn't reliably ignite the next sparklers in the line, and all of the sparklers burned down so quickly that it was impossible—for me, anyway—to make a recognizable shape.

Then I thought about drawing in the air with sparklers, but it's supposed to rain here by the time it's dark enough to do such a thing, so I more or less gave up on any kind of pyrotechnics for today, and settled on drawing with sparklers on paper.


50 cm (20-inch) sparklers.
Source: http://www.fireworks4all.com/weddingsparkler.html


Sparklers are actually hand-held fireworks that burn slowly while giving off sparks. A classic sparkler consists of a thin metal rod dipped in a batter made of the following components:

• A metallic fuel such as aluminum, iron or magnesium to create sparks
• Additional fuel such as charcoal or sulphur to control burning speed
• An oxidizer such as potassium nitrate, barium nitrate or even the potentially explosive potassium perchlorate
• Optional substances to provide coloured flames, such as chlorides or metallic nitrates
• Flammable Binders such as nitrocellulose or dextrin, to hold the mixture together

Although the vast majority of sparklers give off white sparks, some sparklers have a coloured spot on the top of each rod to indicate the colour of the sparks. Some sparklers even give off several colours on the same stick.


Sparklers with coloured dots to indicate colour of sparks.
Source: http://en.wikipedia.org/wiki/File:Unlit_sparklers.jpg


Although sparklers are often used by children, they are not without their risks. The primary risk relates to the temperature at which sparklers burn, which can be as high as 1000˚C to 1600˚C (1800˚F to 3000˚F). This can obviously cause severe skin burns and even set clothing on fire. In dry areas, sparklers can often ignite wildfires and have been banned in some countries during times of drought.

Some people create "sparkler bombs" by binding a bundle of as many as 300 sparklers together with tape, leaving a single sparkler sticking up to use as a fuse. Because these devices contain so much pyrotechnic material, they can actually explode on their own, and have been blamed for three deaths in the United States.

Another good reason, perhaps, not to tie together a hundred or more sparklers...

During my original research on sparklers, I came across a very brief mention of sparkler portraits created by artists Tobias Kipp and Timo Pitkämö. By touching the sparklers to paper, they created something they called pyrografie (not to be confused with wood-burning, or pyrography). Since developing the technique in 1999, they have drawn more than 20,000 such portraits.


Sparkler portraits by the team of Tobias Kipp and Timo Pitkämö.
Source: http://html.pyrografie.de/eng/info.html


There is next to no information on sparkler art online, so I studied the few images I could find, then just dove in. Having survived the much more dangerous fumage technique, I figured I could probably manage sparklers. I only discovered this short video after I'd finished.

I started with regular white bond paper and no idea what I was doing. I lit a 20-cm (8-inch) sparkler and sort of dragged it across the paper in an elephant shape. The most important thing is to keep the sparkler moving, or it will make the paper begin to smoulder, creating holes. It doesn't catch fire as fumage can do, but it can definitely spread out of control very quickly, as you can see in my first two attempts.


For my first elephants, I used one sparkler per drawing. This gives you about two minutes' working time. I found the results interesting, but a bit boring, so I decided to try making drawings with multiple sparklers. I liked this effect much better, the one caveat being that, if you touch the sparkler to an area that's already fairly dark, it's likely to begin smouldering. I kept water handy, but a quick puff of air also blows it out if the paper catches.

Thinking it might help to keep the paper from scorching too severely, I also tried misting the paper first. This didn't make much difference, except to make it more difficult to mark the paper at all. This was my sole damp-paper attempt, which I quickly rejected.


Here are my single-sparkler drawings, in the order in which I created them.


And here are my multiple-sparkler drawings, in the order in which I created them. For these, I used a slightly heavier sketchbook paper. I worried that it might smoulder more easily because it's more porous, but it was fine. I've indicated the number of sparklers below each.


Five sparklers.

Four sparklers.

Six sparklers.

Five sparklers.


A few tips if you decide to try this:

1. Work outdoors. Between the sulphur of multiple matches and the invisible smoke of the sparklers, I ended up with a very sore throat and sore eyes, despite working outside. The originators of this technique appear to wear welder's masks when they work.

2. Keep a spray bottle of water handy, just in case.

3. Keep the sparkler moving constantly across the paper.

4. Use a very light touch. To create most of the fine lines in these drawings, I gently ran the sparkler over the paper as if I were trying to make a very faint pencil sketch or scribble.

5. If you want darker areas, either build these up in layers, or touch the sparkler to the paper very briefly.

To give you an idea of what some of these techniques look like up close, here are a couple of details from my final drawing.


I was bit disappointed that I couldn't produce pyrotechnics today, but this wasn't a bad substitute. It gives you a weird sort of sketchy pointillist effect, unlike the more amorphous look of fumage, but I liked it enough to try it again.


Elephant Lore of the Day
In 2010, an elephant was discovered swimming in the ocean off the coast of Sri Lanka, far from shore and obviously tiring. Although elephants are good swimmers, it was thought that this particular elephant may have become disoriented in rough seas. Often barely able to keep its trunk above water to breath, the elephant looked to be in imminent danger of drowning.

The Sri Lanka Navy sent out a team to try and bring the elephant back to shore. Early attempts to corral the elephant using two small boats seemed only to panic the animal, so a couple of sailors dove into the water with a rope to tie around the elephant and help pull it to shore.

This was a risky move. Not only were the seas quite rough, but trying to get close to a thrashing, tired elephant is not an easy proposition. After a couple of tries, however, the men managed to tether the elephant and started up the boat.

Making its way slowly to shore with the elephant doing its best to paddle behind, the boat finally got the elephant close enough to shore that it could stand up. Or sit down, in this case, as the elephant was obviously exhausted.

The video below shows the rescue from start to finish. The image quality is poor, and the commentary is (I think) in Sinhalese, but you'll get the idea.


To Support Elephant Welfare
Elephant sanctuaries (this Wikipedia list allows you to click through to information
on a number of sanctuaries around the world)
Wildlife Trust of India